Bloglovin

Follow on Bloglovin

Wednesday, November 28, 2012

New 5 Panel Walter Hats + Wallets

If you haven't seen them already, check out Mokuyobi Threads' new 5 panel hats in 8 different prints!  You may recognize some of the prints from earlier posts!  All of the hats have a contrasting solid color lining and adjustable buckle closure to fit a large range of head sizes.  Don't forget to note the new spray painted boxes from the last post in our new display sporting wallets and fabric covered pins.


We also have new tri-fold wallets in tons of new patterns that are pictured below looking pretty snazzy in their new display case.


All the hats!!  With so many different patterns it's definitely hard to pick but I'd have to say my favorite is the sky blocks print, pictured bottom left in the image below.


All of the new wallets lined up:


 Adventure Party

Arrows

Rain

 
Button Style- Comes with a fabric pin to bring an awesome 3D element to the hat!

 Gems

 Triangle Podium

 Sky Blocks

Triangles

Thursday, November 22, 2012

Display-o-rama

Probably the hardest part of doing craft fairs is getting your display just right.  I've been doing them for a while and every time I make tweaks and changes to improve my display but I'm never satisfied with it.  When looking around the Brooklyn Flea one day I found a bunch of awesome fixer upper items to step up my display game.  The first was this wooden mess of a drawer with a rusty handle that was dirty, weathered, and chipping that I got a good deal on that had little cubby holes that fit my wallets perfectly.  After I sanded it down for an hour or so it started looking pretty sweet:


Next came the gesso spray even though the sanded wood looked pretty nice, I wanted to give it a more finished look:


I also got a bunch of wooden boxes that were super cheap and super gross.  After cleaning them with a damp paper towel I started to apply the gesso to these guys:


Once they dried it was time to get fancy with some color spray paint.  Totally transformed!


Here's the three boxes finished also shown with a sweet metal tin I got that I also spray painted, of course.


I came across some awesome mason jars with tension tops and thought they would be really rad filled with paint:


I really love how these came out.  Mini photo shoot:


All the colors!!!!


I left the inside of the drawer sections white and painted the edges to really make the sections pop and painted the handle fluorescent red for another contrast.


Totally official new display!


See it in action in the next posts!

Tuesday, November 13, 2012

Repeating Pattern Sans Computer Tutorial

For the past 3 months, artist Mike Perry hosted an open event exhibition in Prospect Heights, Brooklyn called Wondering Around Wandering where Mike and invited guests had an art gallery and conducted workshops, screenings, gatherings, and more!  All of the events were open to the public and were free to RSVP.


I made it to a few of the workshops including a Saturday morning sketchbook workshop where we learned to throw our drawing apprehensions out of the window!  The most recent workshop I went to was a creating repeating patterns event with Dan Funderburgh.  Now, I've made many a repeating pattern in my day but usually with the aid of the computer.  I wanted to share a method of making a legit repeating pattern like they did in the old days sans computorial assistance.


Take a piece of paper any size, an 8.5" x 11" sheet is a good place to start since it's easy to photocopy but by all means if you want to go bigger or smaller, make it happen!  To ensure that it is perfect, you can use this image I made and then print it out!  It helps if you use a single color marker that has a good thickness to it.  Start to drawn in the middle of the page and continue outward.  The most important part in this first step it to make sure your drawing extends to the top, bottom, and side edges as mine does (above), but do not exceed the cross marks to ensure your pattern will properly repeat.


Once your drawing hits the top and bottom edges, use a straight edge and a cutting device (something that will cut in a straight line) to cut your drawing into 4 squares using the cross marks as a guide.  Use the diagram above to know what arrangement to place your cut squares in and tape it together on the back lining up the edges as close to perfect as you can.


If you did it correctly, all of the blank area that was on the edge before is now in the middle.  Fill up this blank area in the same style you did in the first step to make it look like a cohesive drawing.  No need to worry about lining anything up in this step because if you did everything correctly when you cut and taped it together, your pattern is guaranteed to repeat!


Once you're finished, make a few photocopies of your square (ok, so you have to use modern technology a little bit).  Cut out each of the photocopied squares on the exact edge of the drawing and tape them together.


You should now have a real life tangible repeating pattern!!  You can make it as big as you want and use it as wrapping paper or hang it on the wall as a poster.  The possibilities are endless!!


You can also scan your finished square to repeat it on the computer or to change the colors.  Now, make another!!

Friday, November 2, 2012

Craftember

Just some of the crafty artsy things I've done so far this fall.  I've been really wanting to work with watercolors for some time now so I broke out the paint and started sketching.  It turned into some sort of wilderness themed fashion illustration.  You never know I guess.


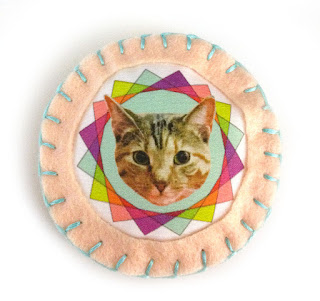
Recently my cat, Teeny got into a bit of medical trouble when she ate some of those fake webs from our Halloween decorations (bad kitty).  The web got stuck in her intestines and made her quite sick so I had to take her to the vet to undergo surgery to have it removed.  She was at the vet for 3 days!  Needless to say I missed her a lot so I made a little plush brooch with her face on it and put it on the Etsy shop in case you have the urge to rock Teeny's head on your body area.

After that I guess I had cats on the mind because I got an idea for a pattern from my dream.  It's super annoying how dreams fade away so quickly once you wake up, but don't worry I did a quick sketch right when I returned from dreamland so I wouldn't forget and later made this pattern:


I think it's funny to be inspired by your subconscious.  Does anyone else dream of pattern ideas?


I made it in a couple monochromatic color ways since that's how I saw it in my dream but then I had to go for a full color version of it (of course).  I think I'm going to use it for holiday wrapping paper.  Now I only have to figure out what crafty gifts I will make that will go inside of it.


A future surprise is coming using these new patterns, an idea from my watercolor, and much, much more!!