Bloglovin

Follow on Bloglovin

Sunday, January 29, 2012

Custom Circus Dress

Circus Carnival (below) is one of the earlier prints I did but one of my faves.  I hadn't really done anything with it after I made it aside from putting it in my print portfolio until my friend Amy saw it and needed to own a dress made with this fabric print.  I was happy to oblige.


Amy is from the UK and worked here in the US for a few years.  As things go we left figuring out the details of the dress until the day before she was heading back to the Queen.  Thankfully I finished in time and when she came to pick up her dress we also had ourselves a bit of a photo-shoot, obviously. 
Doesn't it look super adorable on her?  Everyone in England is gonna be super jealz.

It has pockets and adjustable straps (so fancy).  An awesome red zipper in the back gives the dress some pop!

We had way too much fun during our shoot, haha.  Catch you on the flip side, Amy!!

Tuesday, January 24, 2012

Threadless Plushie

I worked on a little plush project for Threadless this week, man is that logo hard to cut out.  I put the logo cutout in fabric on the front and made a Threadless themed fabric for the sides and back.
Paper cutout

Cutout of dyed fabric

Sewn logo

Embroidering Tees bubble

Finished Tees bubble

Completed logo sewn

All of the puzzle pieces

Sewing it all together

Oooooo so squishy

Detail (obviously)

I always like to include a little extra something (I call it a soft book) showcasing some other work (can't hurt)!  Here's the plush fabric envelope.

Envelope back with a fancy looking trim

Peek- a- boo velcro

Fancy border on the cover letter

My two faves!

Love that detail pic

Saturday, January 21, 2012

Duvet Dying

Duvets are tricky sometimes.  My old duvet cover was made of cotton which made it super easy for it to attract every lint ball and cat hair in the universe.  Not only that but I swear the duvet made its life goal to never lay evenly in the duvet cover.  After dealing with this for far too long I decided to switch back to the best fabric ever for duvet covers: jersey knit.  They hold the duvet in place with their clingy cuddly goodness and surprisingly don't try to ruin your life attracting every stray dust speck.  I bought a new amazing duvet at Wül (on sale thank goodness) because mine was too large and heavy for its own good.  
The other obstacle of course, was picking the right color.  In the winter you can forget about finding bright colors of anything (clothes, sheets, etc.) So I just got a white one to dye it a golden yellow color.  The cover ended up being too big for the duvet so I had to shave some inches off the top, Teeny helped.

It turned out super well and fits the comforter perfectly.  It totally amps up the room.  I know how everyone goes bonkers for sweet apt pics from people they hardly know so I had to indulge.  I'm super pumped about sleeping in tonight and furthermore will be every time in the future (hint: everyday).  Sleeping is #1 (nacho cheese Doritos are a close second).

PLUS: look at the sweet color combo it makes with my sheet colors.  Have matching fitted and flat sheets is so over.  Goodnight, ZZZzzzzzz......

Wednesday, January 18, 2012

Sadness Meter

I got a paper version of this sadness meter from an issue of Vice Mag a pretty long time ago.  The illustration is done by Johnny Ryan and it is hilarious.  I had the paper one hanging on my wall since I rediscovered it sometime in 2010 going through piles of magazines to trash.  I had laminated it which was working out pretty well until it started to get droopy because the only thing holding it up was a pushpin functioning as the pivot for the meter pin.  I had plans to make it a real live 3-D meter for a while because this drawing is too rad to remain barely functioning in 2-D.

P.S.- I totally made a gif of this because how could I not?


I finally got around to printing it on fabric now that I'm trying to make my apartment look like some kind of half-way pretend grown-up lives here instead of a college student planning to pack up and get out at the end of the year.  I got a fancy adult wall shelf and thus had some fresh surface area asking to be occupied.

How ya feelin' today buddy?  For the pivot I used a brad that I spray painted yellow which I put inside a small eyelet in the front of the meter which was also obviously, spray painted yellow.

Plushy goodness.


I totally dig it.

Thursday, January 12, 2012

Germany Tote Bags

These gems + more! were recently shipped off to Germany to be sold in Leipzig in a store called Tschau Tschüssi.  If you live in the area go check it out!  It's located at Windmühlenstraße 29.  If you don't live in Germany or plan on going anytime soon, then just enjoy the eye candy.

Friday, January 6, 2012

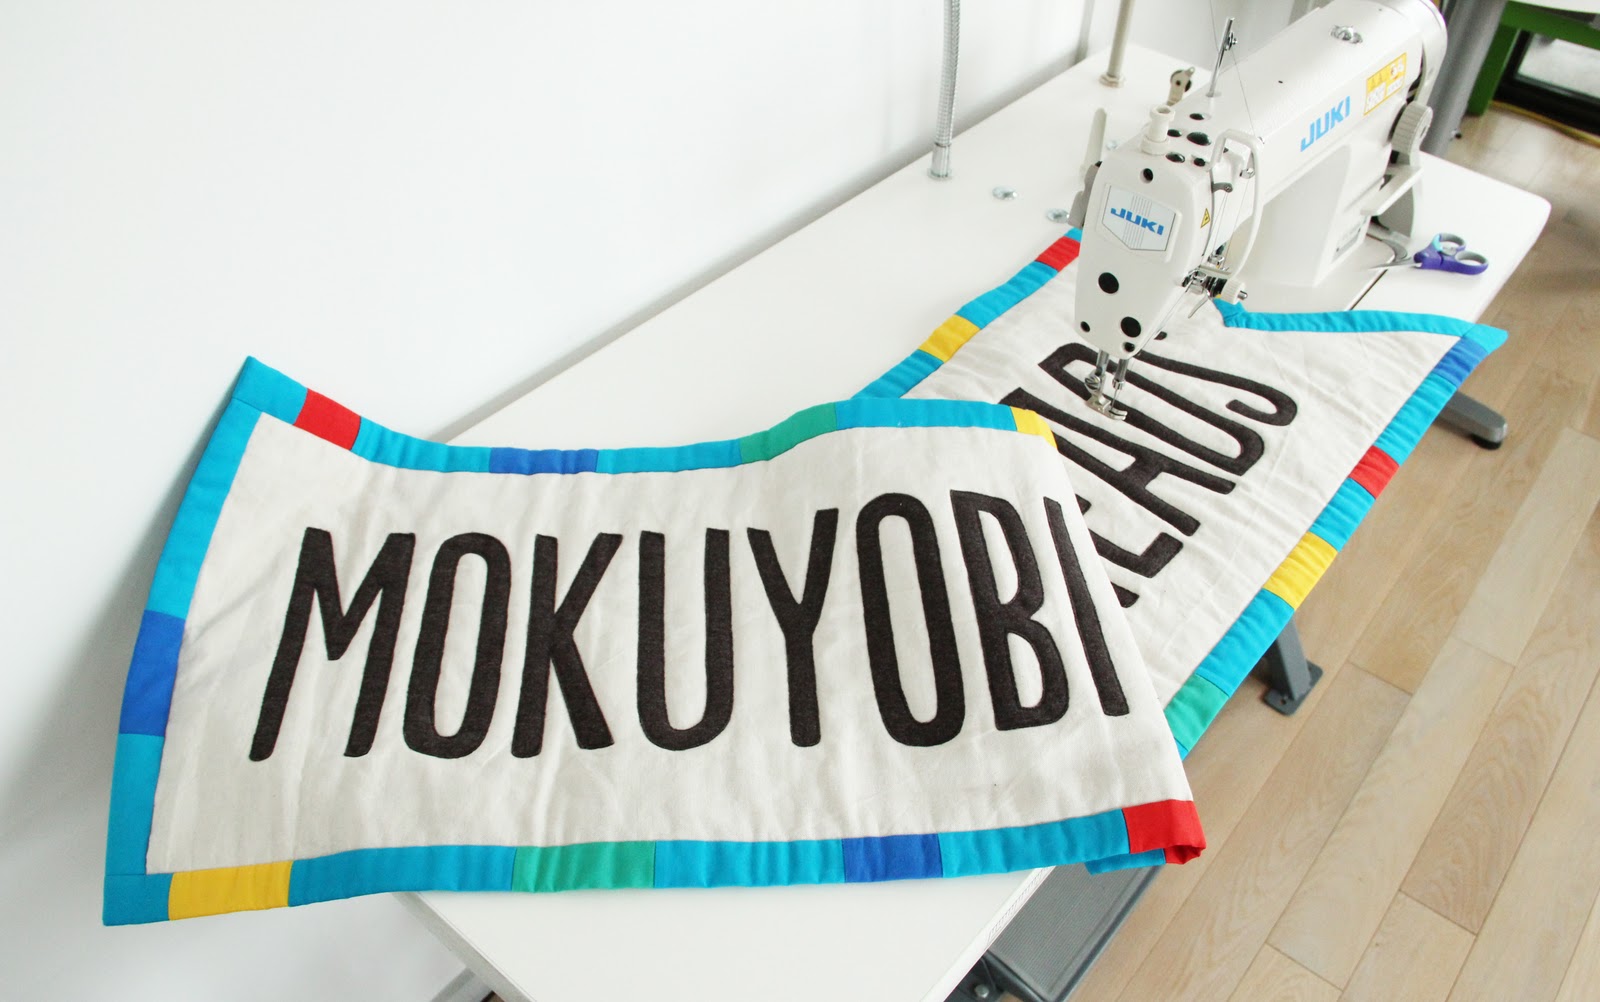
5 Foot Quilted Flag Banner

After doing some rebranding for Mokuyobi Threads with the new website I wanted to make a REALLY BIG new plush banner to hang at craft fairs and other events.  I went all out on perfection with this one.  I had to cut out each letter like a million times for all of the different letters.  One for paper, one for fabric, and one for interfacing (plus my O got really worn out because I only made one).  All that cutting made me wish I had chosen a shorter company name or at least one with more repeating letters.  Oh well, continuing onward...

 Some of my various tools with the letters cut out.  Looks pretty sweet, but it was only the beginning.

 I used this really awesome oatmeal linen on the front and back with a layer of batting in between.

I placed and secured each individual letter making sure my kerning was working for me.  I used the original long vector flag logo to figure out exactly how big I wanted each color strip to be.  Then I cut, sewed, and serged a long fabric piece for each side of the flag and short pieces for the sides.

I pre-ironed the back seam allowance before sewing.  In order to not waste fabric that would be hidden anyway I sewed each strip 3/4" inside the flag edge creating a 1" border.

 The excess fabric was folded to the back and hand stitched which really gives it that hand made quilty feeling.

 I stitched the corner bits even closer together because you don't want to see any of this behind the scenes business from the front (the angled edges were a bit tricky).

 Once the borders were finished I sewed down each letter to create a little quilted puff for each sewn piece.

 Almost done!
 Finishing touches: Some bright red spray painted large eyelets.  I love how they give the flag a nautical feel.  This might be my favorite detail on the flag.

 Ta-da!!!  Finally done and now hanging on my wall (until it is needed in the world)!  The final dimensions are 4' 8" long and 14" tall, quite large not that it could ever really be TOO big.

All the stitching on the back.  I put another little eyelet on the top left only on the backside to assist in the wall hanging.  When I end up actually using it in the front of a booth I will probably sew some hooks and loops to the flag and the tablecloth.  Onto the next project!

Friday, December 23, 2011

Handmade Holiday + Stitches

It's been an interesting week.  Somehow I managed to cut the top of my #1 finger washing a LARGE (and very sharp) kitchen knife.  It wouldn't stop bleeding so I had to go to the emergency room and I got 4 stitches.  I didn't think it would affect the function of my right hand (I'm right handed by the way) but oh was I wrong.  This created a bit of a problem for me since, you know, I work with my hands a lot.  Showering, putting my hair up, writing, and many other things became temporarily difficult.  With the holidays coming up this incident was certainly a speed bump on the road to making my family handmade presents.  Warning: gross picture approaching...


After it healed for about a week I was finally able to bend my finger and had time to complete all of my presents before I went home, but not without some bloody finger humor:


 I made my own cards this year for my mom, dad, and sister.  Hand drawn and painted with watercolors; best holiday card ever.  And inside the card?


Sometimes you gotta laugh about the bad things that happen to you.


For my sister, Laura (27), I made her an original pink chubby bear.  I had made another bear like this bigger in blue a while ago that she said I should give to her.  I spent 2+ hours hand embroidering the entire nose of that bear:


and I didn't feel like giving it away as a gift so I made her her own (a little smaller) pink bear with cream accents (cause pink's her favorite color).  Instead of embroidering the whole nose I just did the mouth and the outline and colored in the rest with a fabric marker (sneaky).  


The best part of this bear is that it comes with a removable bow pin (so totally her) that she could borrow from the bear and wear if she so desired which she loved.  So adorable.


As for my mommy, she's always looking for lightweight simple bags that she can take on vacation.  She likes LeSportsac bags because they are both of these things but they're not made especially well because just like with any mass produced item, manufacturing corners get cut to make the bags cheaper.  They also don't hold up especially well overtime.  So I decided to make her a LeSportsac style bag.


She's all about the toned down colors so I had a hard time picking a color scheme that I would be ok with making (I tend to lean in the direction of bright colors).  The bag is a neutral grey coated nylon with maroon zippers and a yellow coated nylon lining.  I think it turned out pretty well.  She's also super specific about her pockets and the direction of her zippers so I made sure to pay extra attention to those details.  Of course, she loved it.


My dad was a little trickier.  My sister always gets him books but I don't really read so I have no idea about any of that stuff and I would also feel weird giving someone a book (unless it was a sketchbook I made).  BUT THEN it came to me!  When thinking of things my dad likes, two things immediately came to mind: golf and Crown Royal Whiskey.  So obviously I went with making him a Crown Royal golf club cover.


I did a drawing of a bottle of Crown Royal, scanned it, colored it, and got it printed on fabric.  I kind of guessed on the size since I didn't know which golf club he would want to use it on.  But it actually worked out really well because there was a cover he had for one of his clubs that was getting old and dirty and his new Crown Royal cover fit perfectly!  I made sure to spray it with some scotch gard since I know he'll be playing out in the rain.


Fits like a glove! (It kinda looks like one too I'm surprised he knew what it was when he opened it, LOL)

Hooray for handmade holiday gifts!!!